
The best part of this project for me? I didn’t find it on Pinterest! I Made It Up! lol That may sound silly but in a world of information at our fingertips I get a real sense of satisfaction at coming up with my own ideas!
Here’s what I started with… $5 wooden canvases from Wal-Mart. I actually paid under $5 for mine.

I also bought some of these for a backing. The small pine boards were on clearance for $1.29.
I previously took silhouette pictures of the kids outside by the garage door for good contrast. (I’ve blurred him post picture just for privacy. Your silhouette picture should be as sharp as possible for the best definition.) I also cropped the original photo to cut down on the area I needed to edit.

Then to Photoshop… (you could use most any editing program. I often use a free one called Paint.net)
Load photo into Photoshop and pick Quick Selection Tool

If your contrast is good then your wand should easily (very easily) select the outline of the silhouette. You can fine tune the line if needed. Mine did pretty good in one try.

Select the paint brush in a very large size (to save time) and choose black paint. Then paint over the silhouette. It will only cover the parts highlighted.

Once the black is filled in, choose to Select Inverse to highlight the background of the photo.

Then repeat the previous step with white as your paint color.

Save your finished photo. I then loaded it into Word, reversed it (I’m going to use the stencil on the back of the canvas), selected how tall I wanted it to be (about 8.5 inches since it’s a 10inch canvas with 3/4 in border). I then printed it out!


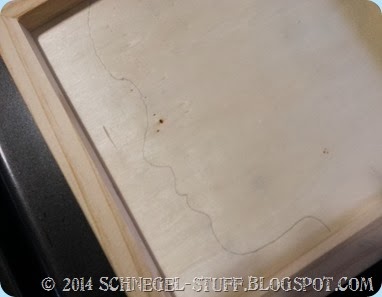
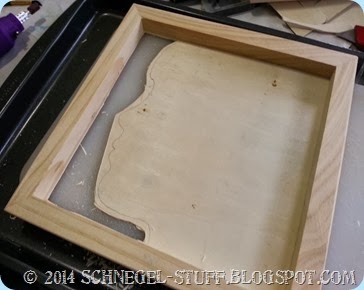
I trimmed my stencil and taped it onto the back of the wooden canvas. I set the neck line just under 4 inches from the front of the frame to ensure the wooden pine board I selected as a background would completely cover the hole. I traced it with a pencil and then traced over the indention left in the wood so I could see it better.

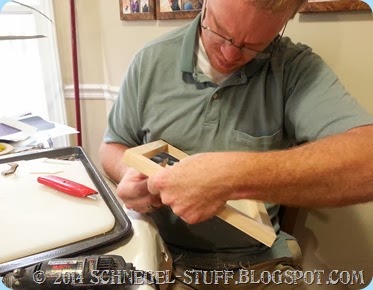
This is where it gets complicated and scary. In my mind we had the right tool to just cut this out. But we didn’t. So, before I found what we finally used I easily cut the silhouette down to this with a box cutter. Be careful, the wood splinters very easily. Next my hubby and I used a dremel tool and the box cutter to grind the wood as close to the line as possible and kind of whittle in the details. Good sandpaper took care of the rest.
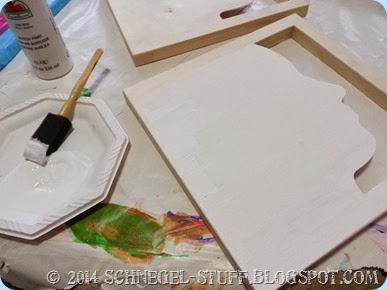
I then gave the final a base coat of white acrylic. A light sanding would definitely help (either before or after the painting). If/when I make my own set (these were a gift) we may either gloss coat them in black or maybe even stain the two wooden surfaces with different wood stains. You could modge podge them, write on them, possibilities are endless.

I set the pine board behind it and it will eventually be painted black for this project but there are many options here. You could cover it in fabric, modge podge on some writing or photos, or leave it out entirely. The wall color would show from behind and a light could even be placed inside to accentuate the silhouette.


With my hubbies help (and amazing woodworking skills in the face of bad tools) we were able to make 4 of these in only a few hours.

These are amazing, by the way!!
ReplyDeletePaint.net is (at least in our opinion) the simplest option on the list. It still comes with a ton of powerful features like layers, adjustments, and user-created plugins, but is simple enough that complete newcomers can grasp it immediately. The features are across the top, and filters are accessible from a drop-down menu.
ReplyDeleteSome of the special effects are pretty cool: sharpen, blur, distort, emboss, etc. You can even get some Instagram-esque vintage effects in there for good measure. We don’t want to waste too much time on this one. It’s got a lot of features, an easy interface, and a simple layout. If you’re struggling with others on this list, then stick with the easiest option.
It still comes with a ton of powerful features like layers, adjustments, and user-created plugins, but is simple enough that Paint.net is (at least in our opinion) the simplest option on the list. complete newcomers can grasp it immediately. The features are across the top, and filters are accessible from a drop-down menu.
ReplyDeleteSome of the special effects are pretty cool: sharpen, blur, distort, emboss, etc. You can even get some Instagram-esque vintage effects in there for good measure. We don’t want to waste too much time on this one. It’s got a lot of features, an easy interface, and a simple layout. If you’re struggling with others on this list, then stick with the easiest option.
"It still comes with a ton of powerful features like layers, adjustments, and user-created plugins, but is simple enough that Paint.net is (at least in our opinion) the simplest option on the list. complete newcomers can grasp it immediately. The features are across the top, and filters are accessible from a drop-down menu.
ReplyDeleteSome of the special effects are pretty cool: sharpen, blur, distort, emboss, etc. You can even get some Instagram-esque vintage effects in there for good measure. We don’t want to waste too much time on this one. It’s got a lot of features, an easy interface, and a simple layout. If you’re struggling with others on this list, then stick with the easiest option."
The Best eSports Betting Sites in 2021 | Vimeo
ReplyDeleteeSports is a popular form of betting that is popular among bettors due to the skill of the bookmaker. With that said, there are few sites that can truly match youtube to mp4 the